
Is there a way to batch process HTML files using HTML Tidy?
Answer 1. Batch check files using the Batch Action Wizard
The HTML Tidy plugin can be used to check multiple files in one or more folders as well as the current document in the editor.
To check multiple files in a folder using the HTML Tidy plugin:
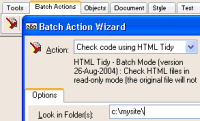
- Change to the "
Batch Actions
" tab and click the "HTML Tidy
" plugin icon (or select "Actions | Batch Actions | HTML Tidy - Batch Mode
" from the main menu).
- Enter the full path to the folder where the HTML/XHTML files are located. For example, to check files in the c:\mysite\ folder, enter c:\mysite\ in the "
Look in folders
" field. Multiple folders can be entered by using the ; character as the separator (for example: c:\mysite\;c:\worksite\). Optionally, check the "Look in sub folders
" option to process files in any sub folders inside the specified folders.
- Enter the file extensions used by the files to be checked. For example, if all your HTML/XHTML files use the *.html extension, enter *.html in the "
Include files of type
" field. If you use multiple extensions such as *.html and *.htm, enter *.html;*.htm
- Click "
Start
" to begin the batch process. The HTML Tidy plugin will check the matching files in read-only mode. The original files will not be changed or updated during the batch process.
- Any errors or warnings related to the files being checked will be displayed on the "
Results
" tab. If you'd like to update or further examine a specific file, click the "Open
" link next to the file or the message. Or, simply click "OK
" to move the results to the "Messages Window
" and click a message to open the related file.
-
Once a specific file is opened in the editor, it can be updated as described in the Introduction to the HTML Tidy plugin. HTML-Kit will automatically mark lines related to HTML Tidy errors or warnings for easy access. The "Alt+F2" key can be used to jump to the next error/warning mark.
Answer 2. Batch update files using the command-line version
By design, the HTML Tidy batch action will not automatically update the files. This is mainly due to the fact that, while HTML Tidy is considered to be one of the best tools in its class, no automated tool can always generate the outcome intended by the author of the HTML file. Because of this reason, it's usually best to verify the HTML code suggested by HTML Tidy before updating the original file.
However, if you're comfortable with updating the original files without verifying the HTML code, the following solution can be used with the command line version of HTML Tidy. Please note that this solution is not recommended or supported. Use at your own risk.
- Make a backup of the files that you intend to auto update. If anything goes wrong during the automated update, you will have a copy of the original files.
- Download the command-line version of HTML Tidy and unzip it to a temporary folder such as c:\temp\
- Open a Command Prompt (or a DOS box) inside Windows. In Windows NT, 2000, XP and higher, select "
Start | Run
", enter cmd.exe and click "OK
". In Windows 9x and ME, use command instead of cmd.exe.
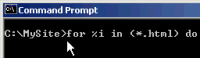
- Change to the folder where your HTML files are located. For example, to change to the c:\mysite\ folder, type C: and press "Enter" to change to the C: drive. Then type cd "c:\mysite\" and press "Enter" to change to the c:\mysite\ folder.
- Type the following line and press "Enter"
for %i in (*.html) do c:\temp\tidy.exe -m "%i"
- HTML Tidy will process every file in the current folder (c:\mysite\ in this case) with the *.html extension and automatically update the original files with the HTML code generated by it.
- Finally, examine the updated files. If it's not possible to examine each and every file, at least some of the more complex files should be manually inspected to make sure that the files were updated as you intended.
© 2008 Chami.com. All Rights Reserved. | HTML Kit Site Map | Privacy Statement | Link to this Site | Advertising